How to Take a Screenshot on a Mac
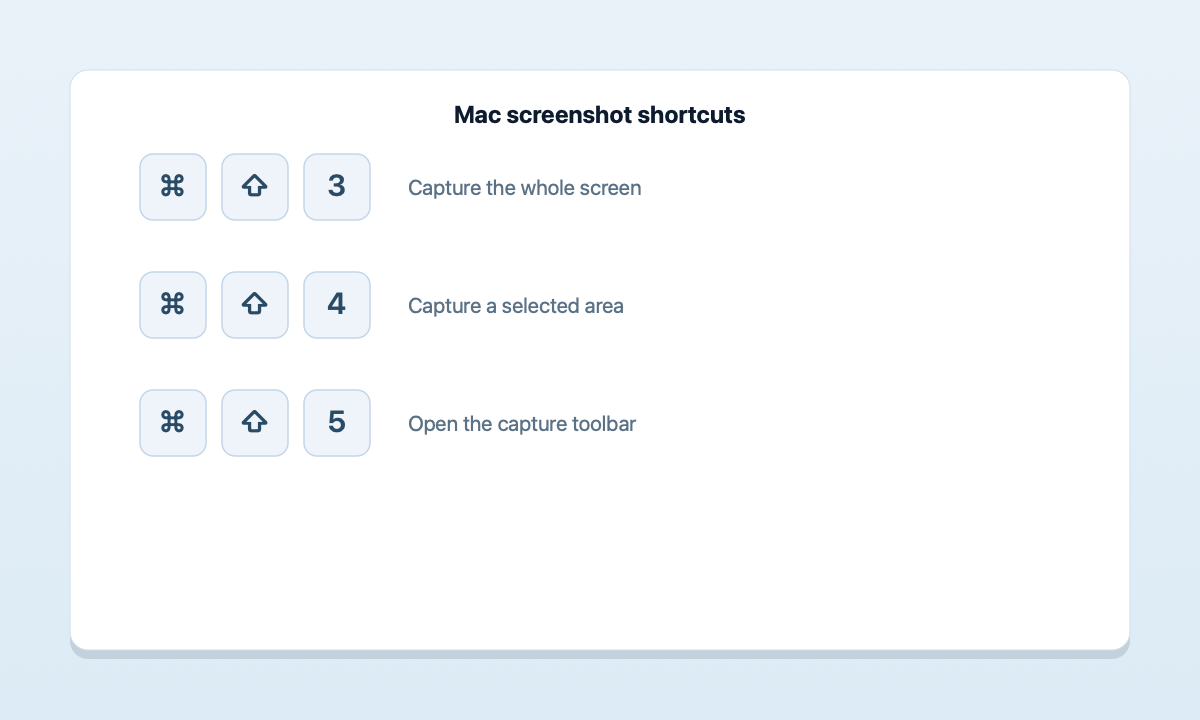
⌘⇧3 to capture the whole screen, or ⌘⇧4 to drag out just a part. Press ⌘⇧4 then the Space bar to grab a single window, or ⌘⇧5 for the full capture toolbar (including screen recording). Every shot saves as a PNG to your Desktop by default.The three shortcuts you need
Every Mac screenshot comes down to three key combinations, all built into macOS — no download required. Learn these and you can capture anything on screen in a second.
⌘⇧3 — whole screen
Press ⌘⇧3 (Command-Shift-3) and macOS instantly grabs everything on your display. If you have more than one monitor, you get a separate file for each. A little thumbnail flashes in the bottom-right corner — click it to mark up the shot right away, or ignore it and it saves itself to the Desktop.
This is the closest thing the Mac has to a "Print Screen" — see the FAQ below if you're coming from Windows.
⌘⇧4 — selected area
Press ⌘⇧4 (Command-Shift-4) and the pointer turns into a crosshair. Drag a box around the part of the screen you want and release to capture just that region. A few tricks while you're dragging:
- Hold Space after you start dragging to move the whole selection box.
- Hold Shift to lock one edge and resize in a straight line.
- Hold Option to resize from the center.
- Press Esc to cancel without taking a shot.
⌘⇧4 then Space — a single window
This is the one most people miss. Press ⌘⇧4, then tap the Space bar once. The crosshair becomes a camera icon — move it over any window and it highlights. Click, and macOS captures just that window with a clean drop shadow, perfectly cropped. Hold Option as you click if you'd rather skip the shadow.
⌘⇧5 — the capture toolbar (and screen recording)
Press ⌘⇧5 (Command-Shift-5) to open the full screenshot toolbar at the bottom of the screen. It gives you buttons for all three capture modes — whole screen, window, selection — plus two you can't get any other way:
- Record entire screen and Record selected portion for screen recordings that save as
.movfiles. - Options, where you can set a 5- or 10-second timer, choose the save location, and toggle whether the pointer shows.
If you only ever learn one shortcut, make it ⌘⇧5 — every other mode is one click away from here.
Where do the screenshots save?
By default, every screenshot lands on your Desktop, named Screenshot 2026-07-07 at 14.32.51.png. Take a handful in a day and the Desktop fills up fast with near-identical timestamps. You can change the folder from the ⌘⇧5 toolbar under Options → Save to, or copy a shot to the clipboard instead of saving a file by adding Control to the shortcut (e.g. ⌘⌃⇧4).
For the full breakdown — including how to change the default location and the naming — see where Mac screenshots are saved.
Doing more than the basics
The built-in shortcuts are great for grabbing pixels, but the moment you need to do something with the shot — annotate it, name it, stitch a long page together — you hit the limits of what macOS ships with. That's where a dedicated app helps.
ScreenDrafter is a native Mac screenshot app that adds the parts Apple left out:
- Annotate in place — arrows, boxes, and text right where you captured, with a pixel loupe for precision and arrows that snap to text. (More in how to annotate a screenshot on Mac.)
- Auto-name every shot — it reads the image on-device with Apple Vision and suggests a searchable filename like
invoice-acme.pnginstead of a timestamp. - Scrolling capture — grab a whole long webpage or chat as one tall image, not a dozen tiles.
- Combine shots and pull text out of any capture with one-key OCR (
⌘⇧9).
ScreenDrafter's own hotkeys sit right next to the system ones: ⌘⇧2 for an area, ⌘⇧1 for the full screen, ⌘⇧9 to grab text. Everything runs on-device — nothing leaves your Mac.
Screenshots that do more than sit on your Desktop
Free for 30 days, then a one-time $9 · ~3 MB · no account. Private, on-device.
Get ScreenDrafter for MacFAQ
What is the shortcut to screenshot on a Mac?
Press ⌘⇧3 (Command-Shift-3) for the whole screen, or ⌘⇧4 (Command-Shift-4) to drag out a selected area. Both save a PNG to the Desktop. For the full toolbar with screen recording, press ⌘⇧5.
How do I screenshot one window on a Mac?
Press ⌘⇧4, then tap the Space bar. The pointer becomes a camera icon — hover over the window you want and click. macOS captures just that window with a drop shadow. Hold Option while clicking to remove the shadow.
Is there a Print Screen on Mac?
There's no Print Screen key on a Mac keyboard — the equivalent is ⌘⇧3 for the whole screen. If you're using a Windows keyboard with your Mac, the physical Print Screen key won't work; use the ⌘⇧3 / ⌘⇧4 shortcuts instead.
How do I screenshot without saving to the desktop?
Add Control to the shortcut to copy to the clipboard instead of saving a file — for example ⌘⌃⇧4 for a selection. To change the default folder permanently, press ⌘⇧5 → Options → Save to. An app like ScreenDrafter can also save straight to a folder of your choice with a descriptive name.
Related: Where do Mac screenshots save? · How to annotate a screenshot →